Showing posts with label Software. Show all posts

Menghilangkan Pesan Illegal Copy pada Corel tanpa Uninstall dan Install Lagi


Setelah sekian capeknya sama si Corel yang terdeteksi Illegal Copy, install uninstall bolak balik, blokir firewall, RMPCUNRL, PSIkey, Edit Host dll, yang yaa pada akhirnya beberapa hari kemudian kembali lagi dikasih pesan lagi sama yg punya Corel.

Akhirnya saya menemukan cara dengan secara tidak sengaja, ketika saya mau nyari data nya Mikrotik. Aku lihat ada folder Corel, tak buka tak hapus hapus gitu, barangkali ngaruh,, kalaupun tidak bisa ya udahlah di uninstall gitu,,  ternyata ehhh gak ngaruh. Cuma pas tak hapus Folder Message udah ga muncul lagi. Setelah tak restart pun juga udah baik baik gak muncul lagi.

Singkatnya begini

  1. Buka Run (Press Windows key + R)
  2. Ketik %appdata% lalu enter.
  3. Ke : Corel folder
  4. Hapus "Messages" folder 
Buka Corel nya udahh


Kontes Parade Sound Panggul


Alhamdulillah dapat Juara


Cara Install Windows 7 Pada Sistem UEFI dan Harddisk Berpartisi GPT


Cara install Windows 7 pada Laptop/PC yang menggunakan UEFI Bios.
Untuk Laptop baru yang FreeDos ataupun yang ingin Dual-Boot Windows 8/8.1 dengan Windows 7 ataupun downgrade dari Windows 8/8.1 ke Windows 7 tanpa harus menghapus seluruh partisi harddisk.

Mengapa harus menginstall Windows 7 pada partisi GPT, bukankah dapat di install Windows 7 pada partisi MBR. Karena pada laptop yang bersistem UEFI, dan sudah di install Windows 8/8.1 (pre-installed) menggunakan partisi GPT.
Menghapus semua partisi dan membuat partisi yang baru untuk Windows 7. Dikarenakan pada waktu pre-installed FreeDos, partisi harddisk tersebut masih menggunakan partisi MBR.
Tetapi bagaimana dengan yang pre-installed Windows 8/8.1 istilahnya Windows ORI/Asli?
Jika sudah terinstall win 8/8.1 yang sudah rusak windows nya dan sudah tidak bisa masuk windows sedangkan datanya sangat penting.
Caranya hanya 2 option.
·         Yang pertama, Anda backup dulu semua data Anda (Jika ada data) dan hapuskan semua partisi dan convert kan partisi HDD tersebut dari GPT menjadi MBR.
·         Kedua, dengan membuat installer Windows 7 UEFI+GPT pada USB Flashdisk atau USB Harddisk.

Disini kita membahas option kedua, karena ribet kan kalau windows sudah tidak bisa dibuka dan harus buka casing ambil hardisk untuk di backup, belum lagi kalau datanya banyak butuh berjam – jam untuk membackupnya.
Untuk itu kita membahas bagaimana membuat installer Windows 7 GPT+UEFI di USB Flashdisk/Harddisk.

1. Download dan Gunakan Utility Rufus (link to download)
Tools ini membolehkan Anda untuk install Windows 7 ke dalam partition GPT.

Setelah download, buka tools tersebut.

2. Pilih option GPT Partition Scheme For UEFI Computer dan load ISO Windows 7.
Note : Windows 7 harus versi 64 BIT. Karena UEFI GPT hanya support Windows 7 64 BIT, versi 32 Bit tidak support.
 
3. Pilih File System menjadi FAT 32. Karena untuk sistem UEFI, hanya FAT 32 yang bisa dikenali oleh sistem UEFI dan berjalan di sistem UEFI.
4. Setelah itu, load ISO Windows 7 x64 dengan option ISO Image.
5. Sesudah load ISO Windows 7 , Click tombol Start untuk memulai proses pembuatan installer.
6. Tunggu sehingga proses setup USB Installer Windows 7 selesai.
7. Setelah selesai, maka akan muncul notifikasi sudah selesai. Dan cabutlah USB Flashdisk tersebut dan colok ke Laptop yang mau diinstall.
8. Hidupkan Laptop, dan masuk ke BIOS sistem UEFI dan pilih boot pertama UEFI : USB Generic Flashdisk, atau berdasarkan nama Flashdisk Anda.
9. Setelah boot dari USB Flashdisk, maka installer Windows 7 akan berjalan seperti biasa dan Anda dapat menginstall pada partisi GPT.
 Demikian semoga bermanfaat ..


SID Komputer Pro


Orang jawa bilang "rego gowo rupo" memang betul, SID Komputer Pro ini sudah memiliki fitur yang lengkap, dengan harga yang sesuai.  Hanya bayar sekali kita dapat software, dapat SN dan aktivasi,  mau dipake berapa komputerpun bisa, mau di install ulang sampek mual jg tetep bisa digunakan.
Jadi tidaklah perlu kita susah - sudah donlot sana sini, krek pet apa ini itu tu tu, yang semua itu hanya menyita waktu kita, dari pada coba sana sini dan weee akhirnya tetep muncul juga jebakan nya alias masih belum berhasil, alhasil nama tokonya beda sm toko sendiri, malu kan >><<
Ada juga yg punya kreknya bayar lebih murah dapat aktivasinya, sama - sama keluar duit ya mendinglah kita beli langsung ke yang berhak.


Cobalah sejenak kita renungkan, kita semua sama - sama memiliki keahlian dibidangnya masing-masing, alangkah indahnya jika kita saling menghargai jasa, karya dan hasil pekerjaan orang lain.
Kita menggunakan jasa dan hasil jerih payah orang lain, akan lebih nyaman kita menggunakannya ,jika kita memberikan apa yang harus menjadi hak orang tersebut.

Lalu salah seorang teman bilang begini, buat apa sih beli yang uda jadi gratisan aja banyak, tentu saja berbeda dong, ada support ada garansi, kita pakenya ga khawatir kalau ada masalah dan masih banyak lagi, namanya orang usaha, itu kan juga termasuk biaya , kita anggarkan khusus buat itu juga, betul begitu bukan,.?

*Butuh bantuan Software + Setting Kasir ? Kami siap membantu anda.


MS Access Password Recovery


Hasil copas dari Read Me nya begini ni :
 
"Using Access PassView"

Using the Access PassView utility is very simple, it doesn't need any installation process or additional DLL files.
You can run the "accesspv.exe" file from any directory you want, and start to work.
In order to get the password from your mdb file, click the "Get Password" button, select the mdb file and the password will be shown in the main text box.

There are also 2 alternative ways for getting the password of mdb file:
  1. Drag & Drop: You can get the password of your mdb file by dragging it from the explorer window into the Access PassView window.  
  2. Command-line: You can get the password of your mdb file by adding the filename as command-line parameter.
    For example:
    accesspv.exe c:\access\mymdb.mdb

Kesimpen File disini : Download

Praktis & all MS Access file extension bisa, .mdb, .mda, .enj dll.
Silahkan di anu sendiri barangkali membutuhkan.


***  @budal menyang dalem e user settingne hotspot ***


Straxx Excel Password Remover


Instructions

This program works on the active workbook in Excel.
This program gives you 2 or 3 new menu items in Excel:
1) Unprotect sheet
2) Unprotect workbook
3) Unprotect all (PRO version only)
The first two removes protection from active sheet/workbook, and the PRO version displays a password that works (most probably not the same as the original).
“Unprotect all” removes workbook protection (applied with “Tools”-”Protection”-”Protect workbook”) and all worksheet passwords in the active workbook. It displays no message at the end, it just stops running.
When the program is running, look to the Excel status bar (on the lower left) which will display the running time.
If Excel appears to freeze, just let the macro do its work. It may take up to a few minutes in Excel 2007, in Excel 2010 it is very fast (usually within a second).

Instructions for pre 2007 versions of Excel
Loading this add-in in Excel gives you the extra menu-items on the bottom of the “Tools”-menu (or equivalent in non-English versions of Excel).
To load this add-in in Excel: Open it the same way you do with Excel workbooks. Installing the add-in does not work for all users.

Instructions for 2007 and 2010 versions of Excel
You must enable macros when you open the workbook if asked.
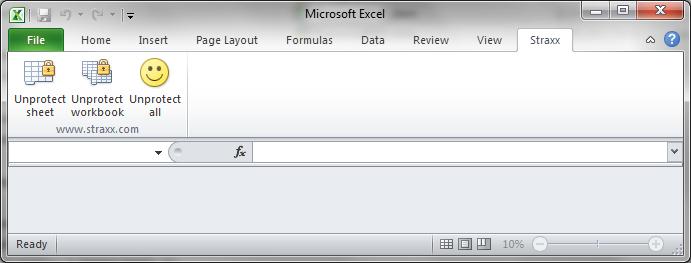
If your settings allows macros to run you will find the new menus under “Straxx” (to the right on the menu bar), and you are ready to go.
If not there are two alternatives:
1. Add the location of password*.xlam to the trusted locations.
Under “Excel options”-”Trust center”-”Trust center settings…”-”Trusted Locations”-”Add new location”, add the path to where password*.xlam is stored
2. Set your macro security level one step down.
Under “Excel options”-”Trust center”-”Trust center settings…”-”Macro settings”, set the level down to “Disable all macros with notification”
Close Excel, start Excel and open password*.xlam
The image below shows the new menu items:

http://www.straxx.com/store/wp-content/uploads/2012/05/excel_demo.jpg

Instructions for Excel 2011

Loading this add-in (and accepting macros to run) in Excel gives you the new menu items on the new “Straxx”-menu (just left of the Help-menu).
To load this add-in in Excel: Open it the same way you do with Excel workbooks. Allow macros to run.

DOWNLOAD

http://www.straxx.com/


Sinau Bebarengan